


I promise you, salt projects are not the only fun activities we do. I figured if you tried my last salt project, yo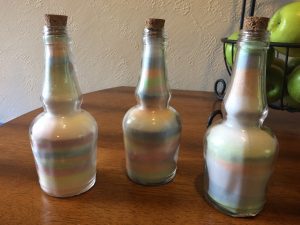 u probably have a ton of salt leftover. If you haven’t, you should check it out! I’m hoping you find these glass bottles filled with colored salt so pretty and so much fun, you’ll wanna do this more than once!
I really enjoyed the previous salt and glue project, but this one is so much prettier. It takes a little more effort and isn’t a super-fast project (I’d give this about an hour to do), but the end results are amazing! The kids and I each did our own and I loved seeing the differences between them.
I did learn something while doing this project. I learned I absolutely hate the feel of chalk on my hands. Yuck! And, it is a little messy, just a fair warning.
Coloring salt with chalk is a fun, family activity that even your littlest of littles can create! When we found this project my daughter was five and she did it all on her own!
This project is pretty cheap to do. The items I didn’t have at home I found at the Dollar Tree. I believe our whole project for the three of us was $5. Your total will depend on what you have on hand and what needs to be purchased.
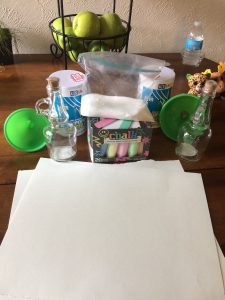
Items you’ll need for your Colored Salt Bottle:
- Glass bottle with a cork stopper
- Salt
- Colored sidewalk chalk
- Thick paper (card stock or construction paper works really well)
- Funnel
The first step is to pour some salt onto your paper. Make sure to thin it out, this makes it easier for the next step.
Next, take your chalk, press down, and rub it over the salt. Keep rubbing until your salt is nicely colored. You may have to do this in chunks as your paper fills up and you may have to switch out your paper if you wear a hole in it. A side note here: you’re going to want more salt than you think, so more is better.
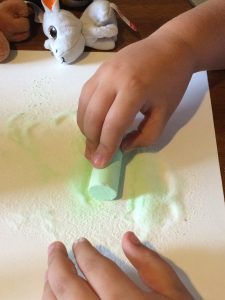
What my kids enjoyed was watching the white salt turn colors. I’m not really sure if different chalk brands, or coloring the salt longer, would make the salt more vibrant, but what we ended with were these beautiful pastel colors.
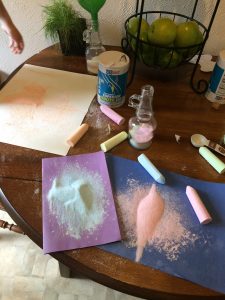
When you’re done with all your colors, take your funnel and place it in the glass jar. Take one salted paper and pour some, or all, into the funnel. There’s no wrong with this. Just keep doing this until you’ve finished your design within the bottle, or, you run out of colored salt. The design is all yours!

We put our colored salt to the very tippy-top of our bottles. You don’t have to but if you don’t, remember that shaking the bottle will possibly mix the colors together.
And lastly, but most importantly…..put a cork in it! Tightly!
I hope you have a ton of fun creating your own colored salt bottle!


